

Double Decker Doggie Bed
Do you have two pups and limited space? Or maybe you want a dog bed with a view. In any case, this corner dog bed is easy to build, doesn't require any advanced tools and can be personalized to you and your pups!


Required Materials
Required Tools
Tape Measure
Drill
Miter Box
Ruler
Clamps (at least 3 but more is better!)
Pencil
Wood Saw
Optional Tools

01
Start Building the Platform
-
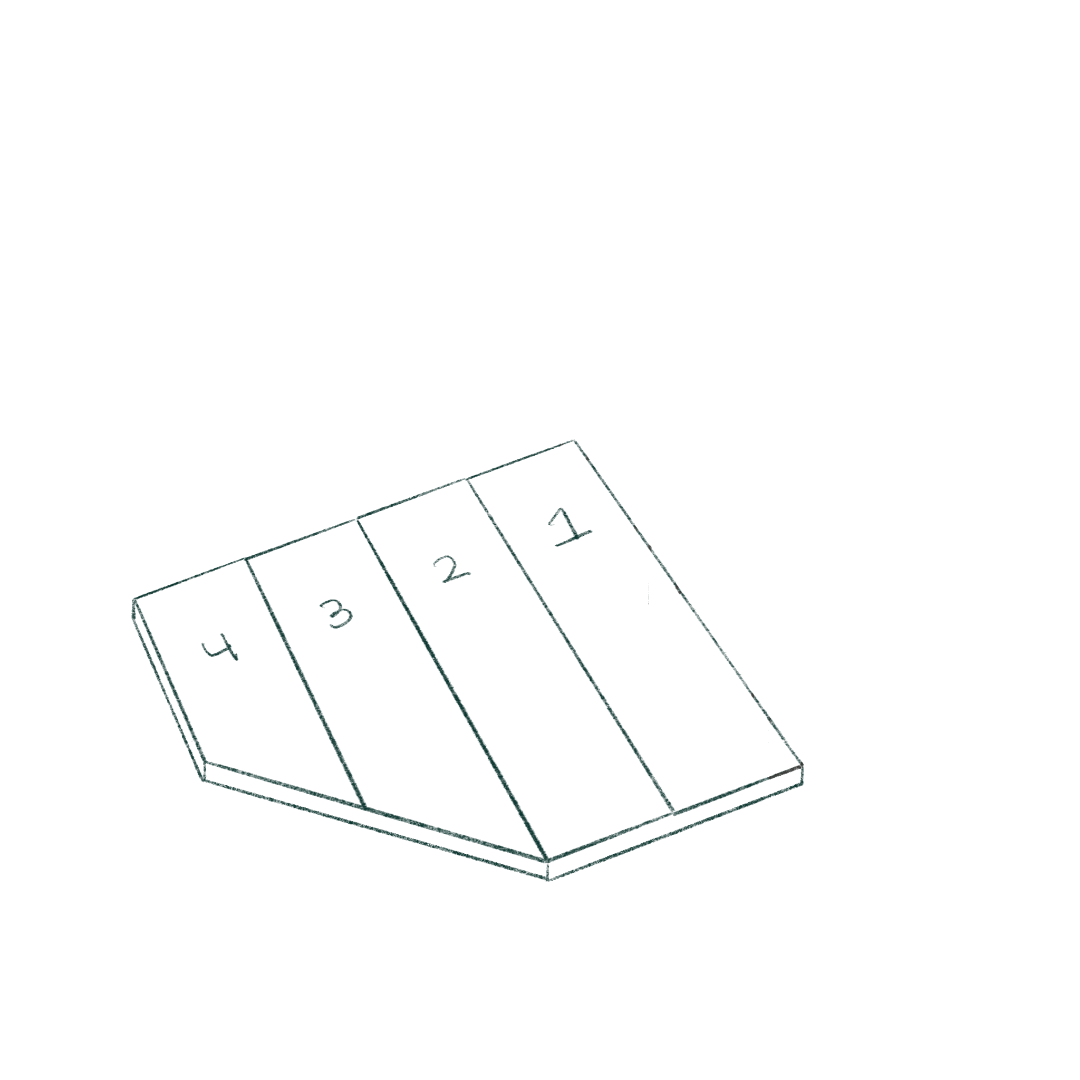
Cut your 1×8" into two 30” segments and lay them next to each other on the ground (1 and 2 on diagram). Then cut another 1×8" to be 30″ on one side and 24″ on the other so that you have a diagonal cut that’s about 45 degrees (see segment 3). Cut one more 1×8 piece to be 24″ on one side and 16″ on the other side (segment 4) and arrange all four segments next to each other on the ground.
-
Decide which side you want the stairs or ramp to be on. The stairs will be up against the shortest 1×8 labeled “4”. Arrange them like the photo below and then flip your 1x8s over so you’re looking at the bottom of the platform.
02
Measure and Cut the Legs and Supports
-
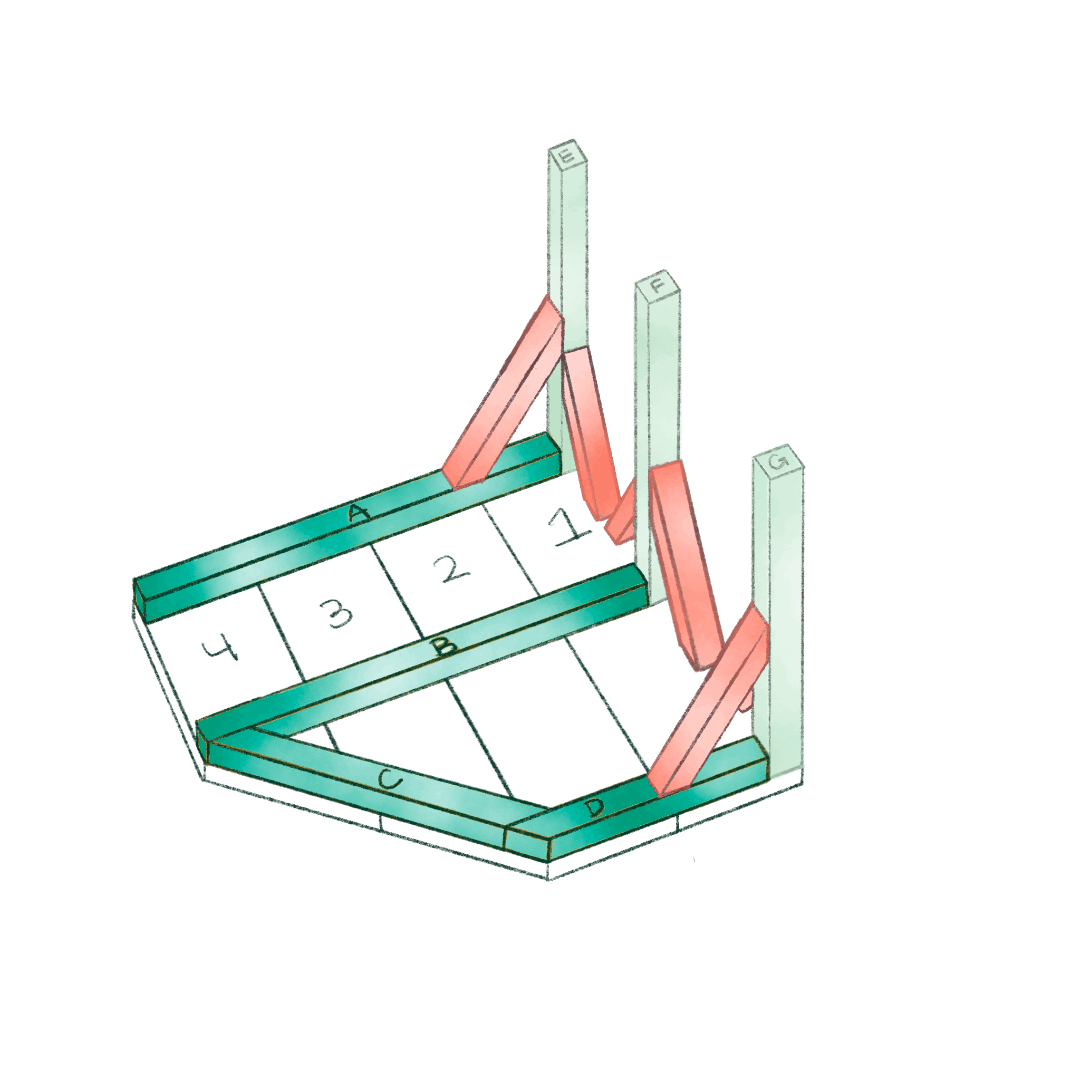
Grab your 2×2’s and cut three legs 26″ long. These are labeled “E”, “F”, and “G” in the diagrams.
-
Place one leg in the corner of “1” and measure how long to make 2×2 support segment “A”. Cut your segments “A” and “B” to this length. Use a leg again to determine the length of segment “D.” Measure both the short side and long side of segment “D” so that you cut the proper angle. It should be about 45 degrees. Measure the length of segment “C.” *
-
Before attaching your supports, cut two more segment “C”s. Then cut two segment “H”s, these are similar to "D"s but instead of leaving space for the leg, extend these two all the way to the edge of 1. You should have a total of 3 “C” segments, 1 “D” segment and 2 "H" segments.


* Pro Tip
Lay a 2×2 next to the diagonal edge of “3” and “4.” then use a ruler to draw lines parallel with “B” and “D” to get the right angles to cut segment “C.”*
03
Attach the Platform Supports
-
Flip your platform back over so that your 1×8’s are lying on top of your 2×2 supports A-D. Make sure to push the segments against the edge of “4” to leave space on “1” for the three legs.
-
Remove segments 1-4 and apply a generous amount of wood glue to the top of segments A-D. Lay segments 1-4 back down onto the support segments A-D. When you are satisfied with the position, use your 2" wood screws to screw your 1x8's into your support segments. Use two screws per 1x8. "A" should have 8 screws, "B" 8 screws, "C" 4 screws and "D" 4 screws. Remember to wipe away excess glue as you go.

Pro Tip
Before gluing and screwing, drill “pilot” holes just smaller than the diameter of your 2″ screws every spot you plan to put a screw. This will prevent your wood from splitting and will make it much easier to screw in your screws!*
04
Install the Stairs
-
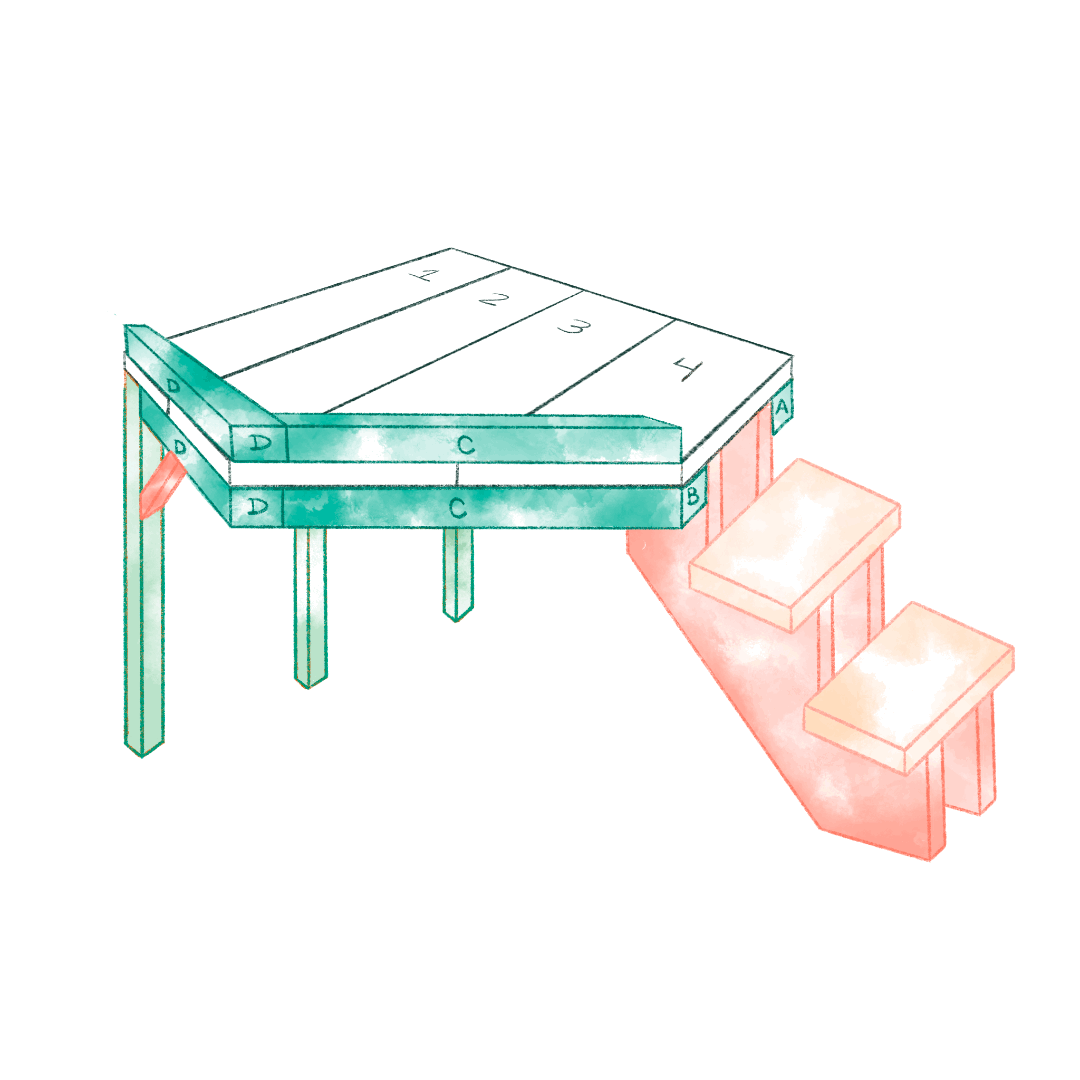
Cut your stair stringers. Cut your stringers to be 26" tall making sure that your step heights are identical for both stringers (trust me, you'll want level steps). Depending on the stringer(s) you purchase, your steps may not be exactly the same height as each other, but they should be close. Remember that attaching the stairs to the bottom of the platform will also add about an inch of height to the top stair. Our bottom two steps ended up being about 9 inches tall and the top one was about 8 inches.
-
Flip your bed over so the platform is on the top. Slide one stringer under the platform and push it up against support segment "A." Check the height and make sure that the platform seems level. Then glue and screw the stringer through the top of the platform using 2-3 screws, drilling pilot holes first to prevent splitting. Repeat the process with the second stringer, making sure to push it flush against segment "B".
-
Cut and install the risers. Cut two 1x8 segments to 16" long. Drill pilot holes, then glue and screw them into the stair stringers. Yay you have stairs now! And the bed should be standing by itself.


Pro Tip
We flipped our stair stringers so that our stairs are more steep ~ 9in for each step to save space, but if you have an older pup or a dog with joint or muscle pain, I'd recommend you extend the stairs for shorter steps or install a ramp instead.
05
Install the Railing
-
This is our second railing iteration since our first one fell off in the middle of the night! That being said, this one is much more sturdy. It's fairly short. As you can see in the photo, it goes just over the dog bed and does just enough to prevent our dog Kylo from falling off the top when he stretches out at night. If you are concerned about your pup trying to jump off the top of the platform, I'd recommend raising the height of the railing.
-
Cut your railing balusters. Cut six 2x2 segments to 10", or 17" for a taller railing. Cut them similarly to the leg supports with the angle at about 45 degrees on both sides.
-
Glue and screw your extra "C" and "H" segments directly over the support "C" and "D" segments.

06
Install the Balusters
-
Glue and screw your balusters into the bottom "C" and "D" segments and top "C" and "H" segments. Each baluster should have two screws once you complete them all. Make sure to line them all up along the bottom of the "C" and "D" supports. Try to get them as straight as you can.
-
Glue and screw the top "C" and "D" segments into the balusters to complete the railing. You can also screw the side of segment "H" into segment "C" for additional support.
-
Congrats, you're done! I hope you like the final result, and I would love to see some pictures of your new bunk bed!
Pro Tip
Use training treats and lots of positive affirmation to get your pups used to the bed and comfortable going up to the top bunk on their own!
